实现说明
前一篇 《SPI框架实现之旅二:整体设计》中,介绍了几个定义的接口,注解;叙述了实现流程;并简单的介绍了 SpiLoader中的部分实现; 本篇则主要介绍SpiLoader类的实现
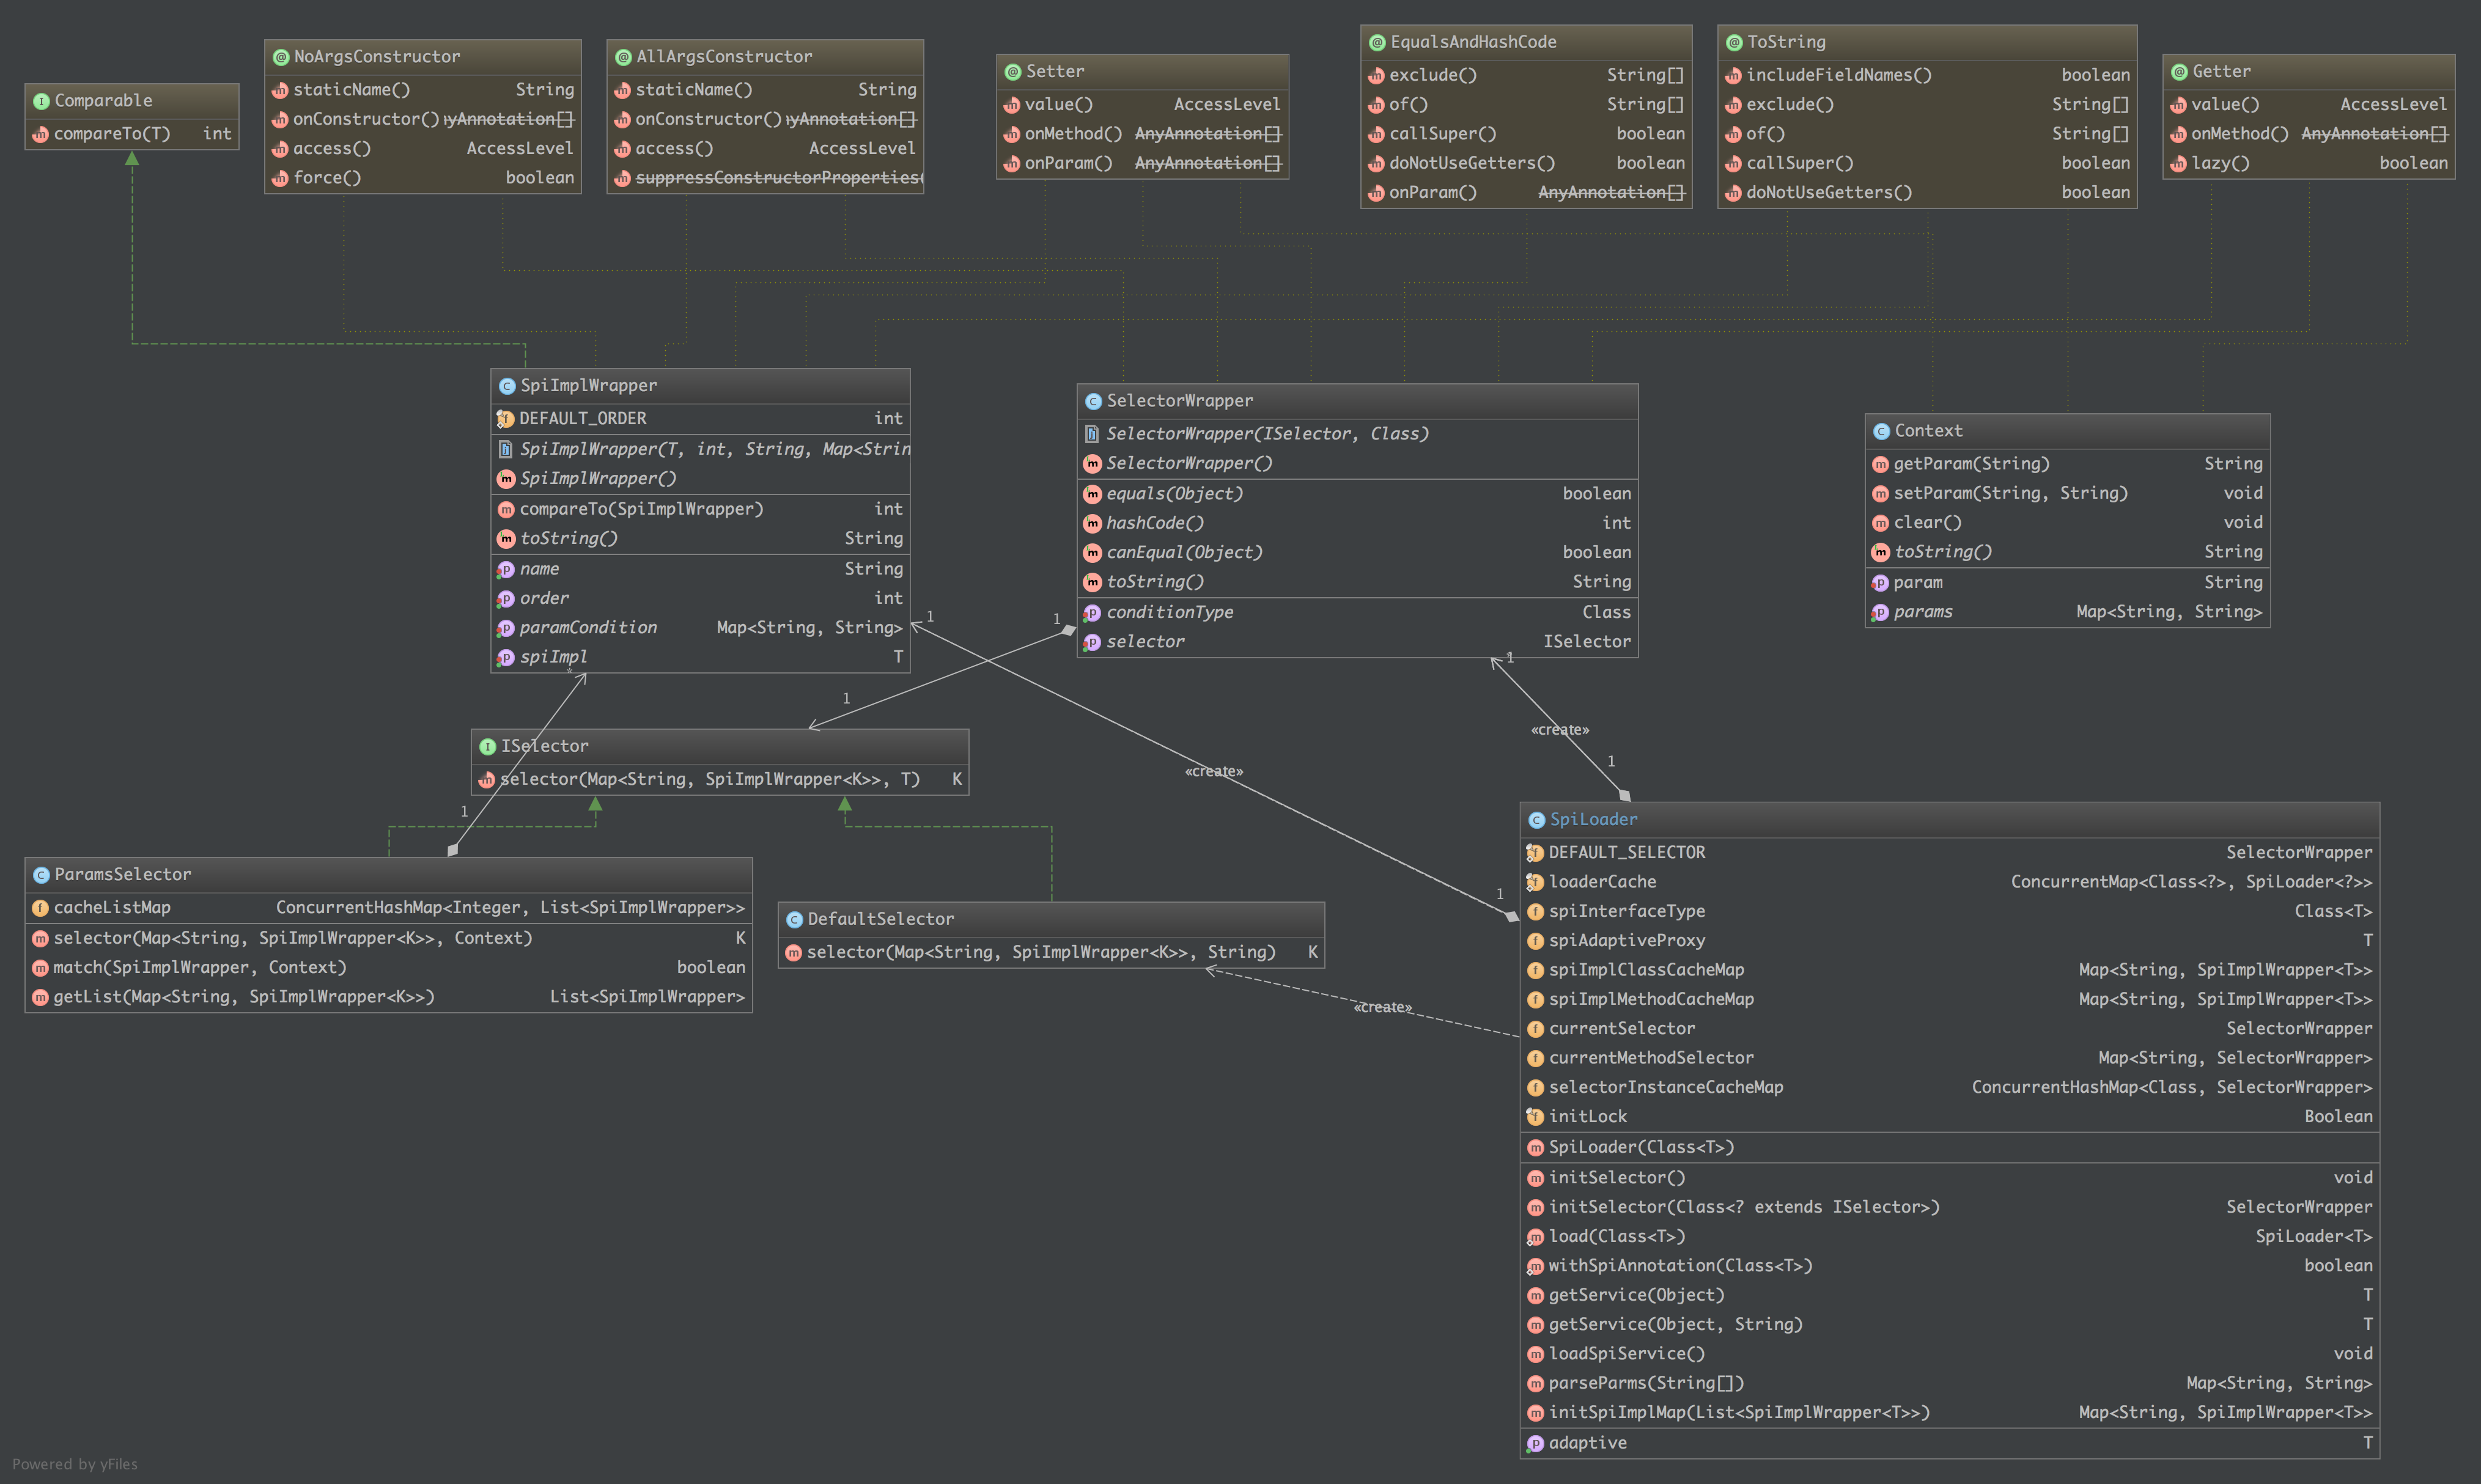
类图结构如下:
SpiLoader 全解析
spiImpl选择的核心类,包括初始化选择器,初始化spiImpl实现列表,解析spiImpl的选择条件,返回具体的实现类等
1. 获取spiLoader对象
SpiLoader 是一个泛型对象,每个SPI接口,对应一个SpiLoader<T> 对象,我们提供了一个静态方法来获取这个对象
实现 优先从缓存中获取, 如果缓存没有,则新建一个;缓存中有, 则直接返回
1 2 3 4 5 6 7 8 9 10 11 12 13 14 15 16 17 18 19 20 21 22 23 24 25 26 27 28 29 30 private static final ConcurrentMap<Class<?>, SpiLoader<?>> loaderCache = new ConcurrentHashMap<>();@SuppressWarnings ("unchecked" )public static <T> SpiLoader<T> load (Class<T> type) { if (null == type) { throw new IllegalArgumentException("common cannot be null..." ); } if (!type.isInterface()) { throw new IllegalArgumentException("common class:" + type + " must be interface!" ); } if (!withSpiAnnotation(type)) { throw new IllegalArgumentException("common class:" + type + " must have the annotation of @Spi" ); } SpiLoader<T> spiLoader = (SpiLoader<T>) loaderCache.get(type); if (spiLoader == null ) { loaderCache.putIfAbsent(type, new SpiLoader<>(type)); spiLoader = (SpiLoader<T>) loaderCache.get(type); } return spiLoader; }
说明
上面有几个校验,前一篇已经说明,不再赘述
上面新建对象,不是线程安全的
2. 新建 SpiLoader对象
创建对象,主要会初始化选择器
实现 1 2 3 4 5 6 7 8 9 10 11 12 13 14 15 16 17 18 19 20 21 22 23 24 25 26 27 28 29 30 31 32 33 34 35 36 37 38 39 40 41 42 43 44 45 46 47 48 49 50 51 52 53 54 55 56 57 58 59 60 61 62 63 private SpiLoader (Class<T> type) selectorInstanceCacheMap.putIfAbsent(DefaultSelector.class , DEFAULT_SELECTOR ) ; this .spiInterfaceType = type; initSelector(); } private void initSelector () Spi ano = spiInterfaceType.getAnnotation(Spi.class ) ; if (ano == null ) { currentSelector = initSelector(DefaultSelector.class ) ; } else { currentSelector = initSelector(ano.selector()); } Method[] methods = this .spiInterfaceType.getMethods(); currentMethodSelector = new ConcurrentHashMap<>(); SelectorWrapper temp; for (Method method : methods) { if (!method.isAnnotationPresent(SpiAdaptive.class )) { continue ; } temp = initSelector(method.getAnnotation(SpiAdaptive.class ).selector ()) ; if (temp == null ) { continue ; } currentMethodSelector.put(method.getName(), temp); } } private SelectorWrapper initSelector (Class<? extends ISelector> clz) if (selectorInstanceCacheMap.containsKey(clz)) { return selectorInstanceCacheMap.get(clz); } try { ISelector selector = clz.newInstance(); Class paramClz = null ; Type[] types = clz.getGenericInterfaces(); for (Type t : types) { if (t instanceof ParameterizedType) { paramClz = (Class) ((ParameterizedType) t).getActualTypeArguments()[0 ]; break ; } } Assert.check(paramClz != null ); SelectorWrapper wrapper = new SelectorWrapper(selector, paramClz); selectorInstanceCacheMap.putIfAbsent(clz, wrapper); return wrapper; } catch (Exception e) { throw new IllegalArgumentException("illegal selector defined! yous:" + clz); } }
说明
持有一个选择器缓存列表,selectorInstanceCacheMap
保证每种类型的选择器,在这个SpiLoader中,只会有一个实例存在
不做成全局唯一的原因是尽量隔离, 比如 ParamsSelector 内部缓存了spi实现的列表,如果全局公用的话,就会混掉,导致这个列表中就出现非这个spi接口的实现类
类选择器 + 方法选择器
currentSelector : 类选择器, 解析 @Spi 注解获取,适用于静态选择 + 动态选择两种使用方式currentMethodSelector : 方法选择器,解析 @SpiAdaptive 注解获取, 仅适用于动态选择SPI实现的方式优先级: 方法上定义的选择器 由于 类上定义的选择器; 方法上未定义时,默认使用类定义的选择器
3. 静态使用
静态使用方式,表示根据传入的条件,选择一个满足条件的实现返回
实现 1 2 3 4 5 6 7 8 9 10 11 12 13 14 15 16 17 18 19 20 21 22 23 24 25 26 27 28 29 30 31 32 33 34 35 @SuppressWarnings ("unchecked" )public T getService (Object conf) throws NoSpiMatchException if (spiImplClassCacheMap == null || spiImplClassCacheMap.size() == 0 ) { loadSpiService(); } if (!currentSelector.getConditionType().isAssignableFrom(conf.getClass())) { if (conf instanceof String) { return (T) DEFAULT_SELECTOR.getSelector().selector(spiImplClassCacheMap, conf); } throw new IllegalArgumentException("conf spiInterfaceType should be sub class of [" + currentSelector.getConditionType() + "] but yours:" + conf.getClass()); } return (T) currentSelector.getSelector().selector(spiImplClassCacheMap, conf); }
说明
spiImplClassCacheMap
spi实现的缓存映射表,优先判断缓存映射表是否存在,不存在时需要初始化;存在时,则进入校验逻辑
校验
校验传入的参数,是否匹配当前的选择器参数类型,为了保证选择器可以正常运行
当不匹配时,会有一个兼容逻辑,判断传参类型是否为String, 是则采用默认的选择器,根据name来选择spi实现 (这种实现可能造成选择的实现不是预期的)
静态使用方式,使用类定义选择器 : currentSelector
静态使用的方式,目标就是事前就确认使用这个实现了,不会出现变动了; 相当于一次确认,所有的调用都是确认的
静态使用,方法注解的选择器无效。这个我们从逆向的思路进行解释
IPrint 是一个Spi接口, 有两个实现 FilePrint, ConsolePrint
假设 `currentSelector=DefaultSelector`, 方法 methodA 上定义的是 ParamsSelector 时
静态使用方式,获取一个spi实现,希望在所有的spi接口使用处,都输出到文件,用户根据 `FilePrint` 选择 FilePrint 这个类来执行具体的输出逻辑, 如果在调用 methodA 方法执行时, 假设根据 ParamsSelector 判断, ConsolePrint 才满足这儿条件,这是相当于在具体实现时,换成了另一个 ConsolePrint, 这下子就与我们的初衷背离了(如果目标是想实现这个场景,显然动态适配的方式才是正确的使用姿势)
loadService 的逻辑后面详细说明
4. 动态使用
动态使用区别于静态的直接确定实现类, 通过getService 获取的并不是某个特定对的实现类,而是一个动态生成的代理,每次具体执行之前,会去判断一下,应该选择哪一个实现来执行
设计的出发点 可以考虑下,我们的目标是在执行方法之前,需要判断一下哪个实现类满足要求,选择这个实现类来执行这个方法,那么我们可以怎么去做?
考虑到切面的方式,如果有一种手段,在方法执行之前,织入一段业务逻辑,就可以达到上面的目的
最开始虽然是怎么想的,但是有点尴尬的是,不知道怎么去实现;因此换了一个思路,我自己新生成一个接口的实现类,在这个实现类里面做选择逻辑,然后把这个实现类对象返回
实现如下 和静态实现的逻辑差不多,一般流程如下:
判断spi实现类的映射关系表是否初始化,若没有则初始化
获取选择器
优先从方法选择器中查找, 若存在,则直接选中;
不存在,则使用类选择器
校验:判断传入条件参数类型是否满足选择器的参数类型匹配(将方法的第一个参数,作为选择器的选择条件)
返回实现类
1 2 3 4 5 6 7 8 9 10 11 12 13 14 15 16 17 18 19 20 21 22 23 24 25 26 27 28 29 30 31 32 33 34 35 36 37 38 39 40 41 42 43 44 45 46 47 48 49 50 @SuppressWarnings ("unchecked" )public T getService (Object conf, String methodName) throws NoSpiMatchException if (spiImplClassCacheMap == null || spiImplClassCacheMap.size() == 0 ) { loadSpiService(); } SelectorWrapper selector = currentMethodSelector.get(methodName); if (selector == null ) { selector = currentSelector; currentMethodSelector.putIfAbsent(methodName, selector); } if (!selector.getConditionType().isAssignableFrom(conf.getClass())) { if (!(conf instanceof String)) { throw new IllegalArgumentException("conf spiInterfaceType should be sub class of [" + currentSelector.getConditionType() + "] but yours:" + conf.getClass()); } selector = DEFAULT_SELECTOR; } if (spiImplMethodCacheMap.size() == 0 ) { return (T) selector.getSelector().selector(spiImplClassCacheMap, conf); } try { if (DEFAULT_SELECTOR.equals(selector)) { if (spiImplMethodCacheMap.containsKey(conf)) { return (T) selector.getSelector().selector(spiImplMethodCacheMap, conf); } if (spiImplClassCacheMap.containsKey(conf)) { return (T) selector.getSelector().selector(spiImplClassCacheMap, conf); } return (T) selector.getSelector().selector(spiImplMethodCacheMap, conf + "_" + methodName); } else { return (T) selector.getSelector().selector(spiImplMethodCacheMap, conf); } } catch (Exception e) { return (T) selector.getSelector().selector(spiImplClassCacheMap, conf); } }
说明
这个方法通常是由框架生成的代理实现类来调用(后面会说明动态生成代理类的逻辑)
区别与静态使用方式, 优先根据方法名,查找对应的选择器;当未定义时,使用类选择器
默认选择器,根据name来查询实现时,传入的参数特殊处理下,主要是因为 spiImplMethodCacheMap 中key的生成,有一个小转换
若实现类上没有 @SpiConf注解,或者 @SpiConf的注解没有定义 name 属性,则类的唯一标识name为:简单类名; 否则为指定的name属性
若方法上显示使用 @SpiConf 指定了name属性,则key的生成规则为: 方法注解上指定的name;
如果没有 @SpiConf注解,或其中没有指定name属性,则key生成规则: 类name属性 + 下划线 + 方法名
这一点单独看可能不太好理解,因此可以和下面的spi实现类映射关系的初始化结合起来
动态生成代理类的逻辑,放在最后进行说明
5. spi实现类映射关系表初始化
为了避免每次选择具体的实现类时,都去加载一遍,耗时耗力好性能,因此加一个缓存是很有必要的,这里主要说下这个实现逻辑,以及为啥这么干
缓存结构 使用了两个Map:
一个是类级别的映射关系 spiImplClassCacheMap
静态使用时,只会用搞这个
动态适配时,当下面的映射关系中无法获取满足条件的实现时,会再次从这里进行判断
key: @SpiConf 注解中定义的name; 或者spi实现类的简单类名
一个是方法的映射关系 spiImplMethodCacheMap
动态适配时, 选择器优先从这里进行判断
key: @SpiConf 注解中定义的name; 或者是 实现类的 name + “_” + 方法名
1 2 3 4 5 6 7 8 9 10 private Map<String, SpiImplWrapper<T>> spiImplClassCacheMap;private Map<String, SpiImplWrapper<T>> spiImplMethodCacheMap;
实现 1 2 3 4 5 6 7 8 9 10 11 12 13 14 15 16 17 18 19 20 21 22 23 24 25 26 27 28 29 30 31 32 33 34 35 36 37 38 39 40 41 42 43 44 45 46 47 48 49 50 51 52 53 54 55 56 57 58 59 60 61 62 63 64 65 66 67 68 69 70 71 72 73 74 75 76 77 78 79 80 81 82 83 84 85 86 87 88 89 90 91 92 93 94 95 96 97 98 99 100 101 private void loadSpiService () List<SpiImplWrapper<T>> spiServiceList = new ArrayList<>(); List<SpiImplWrapper<T>> spiServiceMethodList = new ArrayList<>(); ServiceLoader<T> serviceLoader = ServiceLoader.load(spiInterfaceType); SpiConf spiConf; String implName; int implOrder; for (T t : serviceLoader) { spiConf = t.getClass().getAnnotation(SpiConf.class ) ; Map<String, String> map; if (spiConf == null ) { implName = t.getClass().getSimpleName(); implOrder = SpiImplWrapper.DEFAULT_ORDER; if (currentSelector.getSelector() instanceof ParamsSelector) { throw new IllegalStateException("spiImpl must contain annotation @SpiConf!" ); } map = Collections.emptyMap(); } else { implName = spiConf.name(); if (StringUtils.isBlank(implName)) { implName = t.getClass().getSimpleName(); } implOrder = spiConf.order() < 0 ? SpiImplWrapper.DEFAULT_ORDER : spiConf.order(); map = parseParms(spiConf.params()); } spiServiceList.add(new SpiImplWrapper<>(t, implOrder, implName, map)); Method[] methods = t.getClass().getDeclaredMethods(); String methodImplName; int methodImplOrder; Map<String, String> methodParams; for (Method method : methods) { spiConf = method.getAnnotation(SpiConf.class ) ; if (spiConf == null ) { continue ; } if (StringUtils.isBlank(spiConf.name()) || implName.equals(spiConf.name())) { methodImplName = implName + "_" + method.getName(); } else { methodImplName = spiConf.name(); } methodImplOrder = Math.min(implOrder, spiConf.order() < 0 ? implOrder : spiConf.order()); methodParams = parseParms(spiConf.params()); if (map.size() > 0 ) { if (methodParams.size() == 0 ) { methodParams = map; } else { methodParams.putAll(map); } } spiServiceMethodList.add(new SpiImplWrapper<>(t, methodImplOrder, methodImplName, methodParams)); } } if (spiServiceList.size() == 0 ) { throw new IllegalStateException("no spiImpl implements spi: " + spiInterfaceType); } this .spiImplClassCacheMap = initSpiImplMap(spiServiceList); this .spiImplMethodCacheMap = initSpiImplMap(spiServiceMethodList); } private Map<String, SpiImplWrapper<T>> initSpiImplMap(List<SpiImplWrapper<T>> list) { Map<String, SpiImplWrapper<T>> tempMap = new ConcurrentHashMap<>(); for (SpiImplWrapper<T> wrapper : list) { if (tempMap.containsKey(wrapper.getName())) { throw new IllegalArgumentException("duplicate spiImpl name " + wrapper.getName()); } tempMap.put(wrapper.getName(), wrapper); } return tempMap; }
上面的逻辑可以分为两块,一块是上半边的初始化,获取spiImplClassCacheMap;@SpiConf注解的捞出来,用于初始化 spiImplMethodCacheMap
说明
缓存结构中value为 SpiImplWrapper
采用 ParamsSelector 时, 要求 @SpiConf 注解必须存在
注意扫描所有方法对应的注解, spi实现类,如果存在继承则会出现问题
// todo 改成 getMethods(), 但是过滤掉 Object类中的基础方法
Method[] methods = t.getClass().getDeclaredMethods();
动态代码生成
上面在谈论动态使用的时候,采用的方案是,生成一个代理类,实现spi接口, 在具体的实现逻辑中,使用选择器来获取满足条件的实现类,然后执行相应的方法
1. 代理类格式 采用倒推方式,先给出一个实际的代理类如下,具体的实现中其实只有两行代码
获取具体的实现类 (调用上面的 SpiLoader.getService(conf, methodName)
执行实现类的接口
1 2 3 4 5 6 7 8 9 10 11 12 13 14 15 16 17 18 19 20 21 22 23 24 package com.hust.hui.quicksilver.spi.test.print;import com.hust.hui.quicksilver.spi.SpiLoader;public class IPrint $Proxy implements com .hust .hui .quicksilver .spi .test .print .IPrint public void print (java.lang.String arg0) try { com.hust.hui.quicksilver.spi.test.print.IPrint spiImpl = SpiLoader.load(com.hust.hui.quicksilver.spi.test.print.IPrint.class).getService(arg0, "print"); spiImpl.print(arg0); } catch (com.hust.hui.quicksilver.spi.exception.NoSpiMatchException e) { throw new java.lang.RuntimeException(e); } } public void adaptivePrint (java.lang.String arg0, java.lang.String arg1) try { com.hust.hui.quicksilver.spi.test.print.IPrint spiImpl = SpiLoader.load(com.hust.hui.quicksilver.spi.test.print.IPrint.class).getService(arg0, "adaptivePrint"); spiImpl.adaptivePrint(arg0, arg1); } catch (com.hust.hui.quicksilver.spi.exception.NoSpiMatchException e) { throw new java.lang.RuntimeException(e); } } }
上面给出了一个代理类的演示,那么剩下两个问题,一个是如何生成代理类; 一个是如何运行代理类(上面是java代码,我们知道运行得是字节码才行)
代理类生成 对着上面的实现,反推代码生成,其实比较简单了,无非就是生成一大串的String罢了,这里真没什么特殊的,贴下实现,逻辑省略
1 2 3 4 5 6 7 8 9 10 11 12 13 14 15 16 17 18 19 20 21 22 23 24 25 26 27 28 29 30 31 32 33 34 35 36 37 38 39 40 41 42 43 44 45 46 47 48 49 50 51 52 53 54 55 56 57 58 59 60 61 62 63 64 65 66 public static String buildTempImpl (Class type) StringBuilder codeBuilder = new StringBuilder(); codeBuilder.append("package " ).append(type.getPackage().getName()).append(";" ); codeBuilder.append("\nimport ").append(SpiLoader.class.getName()).append(";"); codeBuilder.append("\npublic class " ).append(type.getSimpleName()).append("$Proxy implements " ).append(type.getCanonicalName()).append(" {\n" ); Method[] methods = type.getMethods(); for (Method method : methods) { Class<?> returnType = method.getReturnType(); Class<?>[] parameterTypes = method.getParameterTypes(); Class<?>[] exceptionTypes = method.getExceptionTypes(); StringBuilder code = new StringBuilder(512 ); if (parameterTypes.length < 0 ) { code.append("throw new IllegalArgumentException(\"there should be one argument for selector to choose spiImpl\")" ); } else { code.append("try{\n" ); code.append(type.getName()).append(" spiImpl=" ) .append("SpiLoader.load(" ) .append(type.getName()).append(".class" ) .append(").getService(arg0,\"" ) .append(method.getName()) .append("\");" ); if (!"void" .equals(returnType.getName())) { code.append("return " ); } code.append("spiImpl." ).append(method.getName()).append("(arg0" ); for (int i = 1 ; i < parameterTypes.length; i++) { code.append("," ).append("arg" ).append(i); } code.append(");" ); code.append("\n} catch(com.hust.hui.quicksilver.spi.exception.NoSpiMatchException e){\nthrow new java.lang.RuntimeException(e);\n}" ); } codeBuilder.append("\npublic " ).append(returnType.getName()).append(" " ).append(method.getName()) .append("(" ).append(parameterTypes[0 ].getName()).append(" arg0" ); for (int i = 1 ; i < parameterTypes.length; i++) { codeBuilder.append(", " ).append(parameterTypes[i].getName()).append(" arg" ).append(i); } codeBuilder.append(") " ); if (exceptionTypes.length > 0 ) { codeBuilder.append("throw " ).append(exceptionTypes[0 ].getName()); for (int i = 1 ; i < exceptionTypes.length; i++) { codeBuilder.append(", " ).append(exceptionTypes[i].getName()); } } codeBuilder.append("{\n" ); codeBuilder.append(code.toString()).append("\n}" ); } codeBuilder.append("\n}" ); return codeBuilder.toString(); }
动态编译运行 动态编译,最开始想的是利用jdk的动态编译方式,试来试去没搞成功,然后选择了一个折中的方案,把代理类看成是groovy代码,利用 GroovyEngine 来实现动态运行, 这一块的逻辑也超级简单,下面的短短几行代码即可; 后面有空单独研究下java的动态编译
1 2 3 4 5 6 7 8 9 10 11 12 13 14 15 16 @SuppressWarnings ("unchecked" )public static <T> T compile (String code, Class<T> interfaceType, ClassLoader classLoader) throws SpiProxyCompileException { GroovyClassLoader loader = new GroovyClassLoader(classLoader); Class clz = loader.parseClass(code); if (!interfaceType.isAssignableFrom(clz)) { throw new IllegalStateException("illegal proxy type!" ); } try { return (T) clz.newInstance(); } catch (Exception e) { throw new SpiProxyCompileException("init spiProxy error! msg: " + e.getMessage()); } }
小结 至此,核心的东西基本上都过了一遍,主要的设计思路,实现逻辑,执行流程都说完了
博客系列链接:
项目: QuickAlarm
基于hexo + github pages搭建的个人博客,记录所有学习和工作中的博文,欢迎大家前去逛逛
声明 尽信书则不如,已上内容,纯属一家之言,因本人能力一般,见识有限,如发现bug或者有更好的建议,随时欢迎批评指正,我的微博地址: 小灰灰Blog
扫描关注